Introduction needs, challenges and end result
Needs and challenges a bit of background
Drag & drop and related sort function have been around since the web became dynamic. I have
seen them used to solve some tricky UI problems, but also misused to the point of making me cry.
My first serious encounter with drag & drop was last year when I was working on an
application for a wellness center.
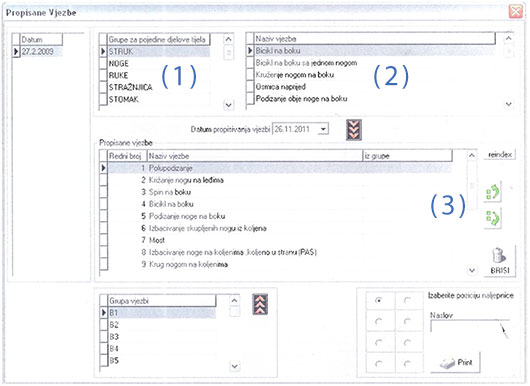
As a part of her individual programme, each client would receive customized list of exercises. A
trainer would choose from hundreds of available exercises: first sorting them by category (1),
then picking an individual exercise (2) and adding it to the list where it could be sorted (3),
as shown in this screenshot of the old application written in Delphi.
At that time, my first idea was to use a value picker and a Dojo List Text Box. The value picker
would allow me to search and select exercises to be displayed in the List Text Box. However, that approach was rejected because the value picker would output exercises in
alphabetic order and there was no possibility to sort the exercises in the List Text Box.
Next in the line was drag and drop, which I felt could solve the problem. But, despite the fact
that some XPages resources related to drag and drop existed (like Keith's and Jake's series), my XPages and JavaScript knowledge (as well as the release schedule) at that time
made this a no-go.
So, I ended up implementing a half-baked solution using a name picker (because it outputs the
values in the order they were selected) and a List Text Box. It was hardly an elegant solution,
but it was good enough.
A year later, it was time to revisit this part of the application and finally make it work as it
should have been from the beginning. Drag and drop was still my favourite solution, so I wanted
to check what had happened since our last encounter.
One new resource that caught my attention was this Marky Roden's post on implementing native HTML5 drag and drop. That article put me in a general direction and
after some additional work I ended up with a fully working solution.
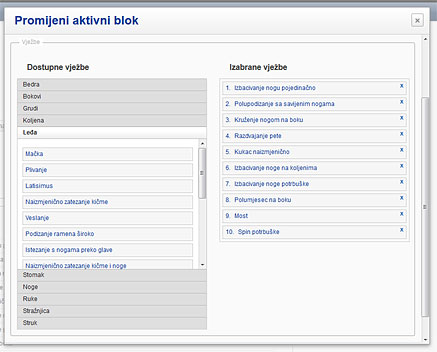
This is a screenshot of the new implementation. On the left-hand side, a Dojo Accordion is used
to allow the trainer to choose a category and display exercises in that category. Selected
exercise is simply drag-and-dropped onto the right-hand side. Once there, the exercises can be
sorted or removed.
Result bells and whistles
Instead of writing my own drag and drop function, I decided to use two different, already
existing, jQuery plugins. One is small, efficient and fast, albeit a bit restricted. The other
one offers all bells and whistles, but is larger and slower. Depending on my needs, I can choose
one or the other. As I am increasingly using Twitter Bootstrap in my XPages applications, jQuery
represents no additional overhead.
The communication between the drag and drop control and the XPages application on the server is
done using Ajax and REST. jQuery has built-in Ajax method and the REST Service from the
Extension Library takes care of the server side.
Here is an example of what your finished drag and drop control could look like.
Car Manufacturers:
- Alfa Romeo
- Audi
- BMW
- Ford
- Jaguar
- Mercedes
- Porsche
- Tesla
- Volkswagen
- Volvo
My Favourites:
- Drop your favourites here
My favourites: (empty)
This is an elaborate example that uses jQuery UI Draggable, Dropable and Sortable widgets. It also uses Pines notifications to display status of Ajax calls.
Each time you drop, sort or delete an item, an Ajax call is generated containing the current
list values. The REST PUT method on the server reads the values and sets a sessionScope variable. If the PUT call is successful, the Ajax method automatically refreshes a computed field that displays
the sessionScope variable. Should the PUT call fail, the Ajax method generates an error notification.
Prerequisites jQuery, plug-ins, ExtLib
jQuery
Regardless of what plugin you choose, you will need jQuery. In case that you are using Twitter
Bootstrap, you already have it. Otherwise, go and download it. Unless you plan to do jQuery development, download the compressed (production) version. These
examples use jQuery 1.9.1, but I guess that they should work with 2.x as well.
The fact that you are using jQuery does not prevent you from using OneUI or any other Dojo-based
framework. In fact, my wellness center application is a OneUI-based application.
I usually put my resources in the WebContent folder. If you want to do the same, simply create a
new folder under the WebContent folder and put (drag and drop works fine) the downloaded jQuery
library there.

Depending on the way your Domino Designer is set, creating a new folder might not be that
simple. First of all, you need to make sure that you see the Package Explorer. By default,
it is displayed next to the Database Navigator in the XPages perspective (Window > Open
Perspective > XPages).
In the Package Explorer, navigate to the WebContent folder. Right click on it and choose New
> Other... In the window that opens, expand the General category, click Folder and then
click the Next button. Finally, enter the name in the Folder name field and click Finish.
Before you use the jQuery library, you need to include it in your XPages. How you do that
depends on whether you plan to use it on one (few) pages or in a whole application. To include
it in a single page, simply use the script tag:
<script type="text/javascript" src="js/jquery-1.9.1.min.js"></script>
Alternatively, for using it application-wide, add it to your theme file:
<resource>
  <content-type>application/x-javascript</content-type>
  <href>js/jquery-1.9.1.min.js</href>
</resource>
If you are new to themes, you might want to start with this
Julian Buss's post. From then on, Google is your friend.
Plug-ins
The plug-ins provide drag and drop, as well as sort functionality. I have tested two different
approaches here, which both work very well and can fulfill all imaginable requirements.
- HTML5 Sortable
- The first plug-in is HTML5 Sortable. This is a very small (less than 2 kB minimized) and fast plug-in that utilizes the native
HTML5 drag and drop API.
- jQuery UI
- The second plug-in is actually a collection of three different jQuery UI widgets: Draggable, Dropable and Sortable. These widgets provide considerable configurability and extensibility, but come at the
price of being significantly larger than the HTML5 Sortable.
Which plug-in you choose will depend on your exact needs - I'll explain the main differences
when we come to practical examples.
Installation
First of all, you need to download the plug-ins.
It is easy for HTML5 Sortable: download it, extract it and put the minimized version (jquery.sortable.min.js) in your WebContent/js (or
whatever you named it) folder - just like you did with the jQuery library.
It is a bit more work for jQuery UI widgets. jQuery UI is huge and you'll want to choose only
the parts that you need. So, head over to the download page. Then select as follows:
- Under Version: select 1.10.3 (latest version)
- Under UI Core: select Core, Widget and Mouse
- Under Interactions: select Draggable, Dropable and Sortable
- Under Widgets: deselect all
- Under Effects: deselect all
- Under Theme: select No Theme
I have chosen not to include CSS styles, as I will provide my own. If you want to choose default
jQuery UI styles, make appropriate selection under Theme.
Click the Download button to save your customized library. Extract the files and navigate to the
jquery-ui-1.10.3.custom\js folder and then drag and drop the minimized version
(jquery-ui-1.10.3.custom.min.js) onto your WebContent/js folder.
Finally, you need to include the plug-ins in your XPage. Presumably, you will use this
functionality on a limited number of XPages, so it is best to include them using the script tag, similar to this:
<script type="text/javascript" src="js/jquery-ui-1.10.3.custom.min.js"></script>
Heads up! Depending on how you import libraries (using script tag or via themes) and whether you
checked Use runtime optimized JavaScript and CSS resources in the XPage Properties Editor, you might encounter problems running your JavaScript,
which (I guess) happen because of namespace collisions. Should this happen to you, try changing
the way you import libraries and/or toggling the runtime optimization option.
Extension Library and your own code
You will also need the Extension Library in order to use the REST Service control. I guess that
mostly everyone has the Extension Library installed and configured by now, but in case that you
don't, you can download it at the OpenNTF.org site.
Finally, in order to make everything work as it should, you'll have to write some client and
server JavaScript code of your own. It is nothing difficult and I'll try to explain as much as
possible using practical examples. Hopefully, that will be enough to get you started.
Implementation let's write some code!
Coding Drag and Drop
These initial examples use HTML5 Sortable as it is easier to use. We'll deal with jQuery UI
widgets when we get to more advanced examples.
Implementation of drag and drop is usually done using unordered lists, ul, but you could use almost any other HTML element.
Below is a simple example, you have an unordered list on the left-hand side. Simply grab one of
the elements and drop it on the placeholder on the right-hand side. Go on, try it!
Car Manufacturers:
- Alfa Romeo
- Audi
- BMW
- Ford
- Jaguar
- Mercedes
- Porsche
- Tesla
- Volkswagen
- Volvo
Once the element is on the right-hand side, you can change its position relative to the other
elements. You can also grab it and drop it back onto the source list on the left-hand side, thus
effectively removing it from the target list.
Let's take a look at the code. The HTML code is nothing special:
<div class="sideBySide">
  <div class="left">
    <ul class="source connected">
      <li>Alfa Romeo</li>
      <li>Audi</li>
      <li>BMW</li>
      <li>Ford</li>
      <li>Jaguar</li>
      <li>Mercedes</li>
      <li>Porsche</li>
      <li>Tesla</li>
      <li>Volkswagen</li>
      <li>Volvo</li>
    </ul>
  </div>
  <div class="right">
    <ul class="target connected">
    </ul>
  </div>
</div>
We can ignore div tags as they are only used to position lists. We then have two unordered lists, one with
some items, and the other empty. The important thing to note here are the classes attached to
these lists: source, target and connected.
JavaScript code required to make this example work is extremely simple:
<script type="text/javascript">
  $(function () {
    $(".source, .target").sortable({
      connectWith: ".connected"
    });
  });
</script>
If you are not familiar with jQuery, this syntax means that all of the code between lines 2 and
6 will be executed once the document and the DOM tree are loaded.
On line 3 we select all HTML elements with class source and target (i.e. our unordered lists) and attach sortable() to them which enables drag, drop and sort functionality.
On line 4, we also pass connectWith: ".connected" option to the sortable() which enables dragging and dropping between elements of class connected .
Finally, this is the CSS used to style lists in the above example:
ul.source, ul.target {
  min-height: 50px;
  margin: 0px 25px 10px 0px;
  padding: 2px;
  border-width: 1px;
  border-style: solid;
  -webkit-border-radius: 3px;
  -moz-border-radius: 3px;
  border-radius: 3px;
  list-style-type: none;
  list-style-position: inside;
}
ul.source {
  border-color: #f8e0b1;
}
ul.target {
  border-color: #add38d;
}
.source li, .target li {
  margin: 5px;
  padding: 5px;
  -webkit-border-radius: 4px;
  -moz-border-radius: 4px;
  border-radius: 4px;
  text-shadow: 0 1px 0 rgba(255, 255, 255, 0.5);
}
.source li {
  background-color: #fcf8e3;
  border: 1px solid #fbeed5;
  color: #c09853;
}
.target li {
  background-color: #ebf5e6;
  border: 1px solid #d6e9c6;
  color: #468847;
}
.sortable-dragging {
  border-color: #ccc !important;
  background-color: #fafafa !important;
  color: #bbb !important;
}
.sortable-placeholder {
  height: 40px;
}
.source .sortable-placeholder {
  border: 2px dashed #f8e0b1 !important;
  background-color: #fefcf5 !important;
}
.target .sortable-placeholder {
  border: 2px dashed #add38d !important;
  background-color: #f6fbf4 !important;
}
You can choose your own class names instead of source and target, simply replace them in the HTML and the JavaScript code.
As you can see, there are no styles defined for the connected class, as it is only used to tell the HTML5 Sortable code which lists to connect.
There are also two class names, sortable-dragging and sortable-placeholder, which are hard-coded in the HTML5 Sortable. These two classes are used for styling items in
dragging state and drop placeholders.
Making it XPages friendly
Static lists are great for examples, but I doubt you'll find them useful in your XPages
application.
You would probably want to read list items from a view or perhaps some field. The easiest way to
implement it is by using the Repeat control, similar to this:
<ul class="source connected">
  <xp:repeat id="repeat1" rows="30" var="manufacturer" removeRepeat="true">
    <xp:this.value>
      <![CDATA[${javascript:
        return ["Alfa Romeo", "Audi", "BMW", "Jaguar", "Mercedes", "Porsche", "Tesla", "Volkswagen", "Volvo"];
      }]]>
    </xp:this.value>
    <xp:text escape="true" id="sourceLI" value="#{manufacturer}" tagName="li"></xp:text>
  </xp:repeat>
</ul>
I am using a static array as data source for the repeat - obviously, you would use your
application specific code instead.
Two things to note here:
- Use
removeRepeat="true" in the repeat control in order to remove div tag that the repeat control generates. - Use
tagName="li" in the computed text control to make it output li tag, instead of the usual span.
All of the JavaScript code should be at the end of your XPage, like this:
<xp:view>
  <!-- rest of the code -->
  <script type="text/javascript" src="js/jquery-1.9.1.min.js"></script>
  <script type="text/javascript" src="js/jquery.sortable.min.js"></script>
  <script type="text/javascript">
    $(function () {
      $(".source, .target").sortable({
        connectWith: ".connected"
      });
    });
  </script>
</xp:view>
Sending sorted list back to server
Once we have a working drag and drop control, it is time to think about sending the sorted list back to server. In order to do that, we need:
- few lines of JavaScript code to read the sorted list and prepare values for sending;
- a call to jQuery.ajax() to send the prepared values;
- a REST control with PUT method that receives the values and stores them.
I use JSON as content type both for sending request and receiving response from the server. These are simple examples and I could have used plain text as well, but JSON is much more robust and flexible (as you will see when we come to the advanced examples).
Reading list and preparing values
We use jQuery to find our sorted list, read values and prepare them for sending. The code looks like this:
var items = [];
$("ul.target").children().each(function() {
  var item = {manufacturer: $(this).text()};
  items.push(item);
});
var jsonData = JSON.stringify(items);
On line 1, we create an empty array to hold our values.
Then on the line 2, we first find our target list by specifying tag and class (ul.target) and then for each child (that would be our li items) we run a function.
In the function, we create a key/value item by specifying key manufacturer and reading text value of the current li item (line 3). Then we add the item to the items array (line 4).
Lastly, on line 6, we call JSON.stringify() on the array in order to get a valid JSON structure.
Ajax call
We use jQuery.ajax() method to send request with sorted list values to the server and receive response:
$.ajax ({
  url: "dnd.xsp/setfavourites",
  type: "PUT",
  data: jsonData,
  dataType: "json",
  contentType: "application/json; charset=utf-8",
  success: function(){},
  error: function(){}
});
If you are new to jQuery: jQuery.ajax() is the same as $.ajax().
Let's analyze the call:
- url
- The url of your REST control. In 99.9% of cases, the REST control will be on the same page as your drag and drop controls, in this case dnd.xsp. The remaining part is the name of the PUT method, setfavourites.
- type
- Type of the REST method, we use PUT (we could have used POST as well, but I think PUT is more appropriate for this kind of updates).
- data
- Data to be sent in the call - we prepared it earlier and saved in the jsonData variable.
- dataType
- Type of data that server returns. Our PUT method returns JSON. Note that server must return valid JSON (can be an empty element), otherwise
jQuery.ajax() raises error. - contentType
- Content type to use when sending request to server. Our PUT method expects JSON.
- success
- Function to execute if Ajax request complets successfully. During development, you can insert
alert() call here to monitor what happens. It is here that calls to Pines notification are made in the first example. - error
- Function to call if Ajax request fails. During development, you can insert
alert() call here to monitor what happens. It is here that calls to Pines notification are made in the first example.
You'll find detailed information on jQuery.ajax() method and additional parameters on the official site.
REST control
Let's begin by dragging REST Service (Controls > Data Access > REST Service) control to the XPage - I usually insert it towards the end of the page.
<xe:restService id="setfavourites" pathInfo="setfavourites">
  <xe:this.service>
    <xe:customRestService contentType="application/json" requestContentType="application/json" requestVar="rqst">
      <xe:this.doPut>
        <![CDATA[#{javascript:
          if (rqst.length == 0) {
            sessionScope.put("myFavourites", "(empty)");
          } else {
            var favourites:java.util.ArrayList = new java.util.ArrayList;
            for (var i = 0; i < rqst.length; i++) {
              favourites.add(rqst[i].manufacturer);
            }
            sessionScope.put("myFavourites", favourites);
          }
          return {};
        }]]>
      </xe:this.doPut>
    </xe:customRestService>
  </xe:this.service>
</xe:restService>
The first thing to note is the pathInfo attribute. Its value must be the same as the last part (after /) of the url in the jQuery.ajax() call.
The REST Service control comes with some predefined methods, but we use custom REST service so that we can freely specify how it should work. We specify that we want to use JSON both as request and response type and we set requestVar attribute. This attribute will hold the content of the request, i.e. our sorted list values.
Since we want to use PUT method, we write all of the code in the doPut.
The first thing we do in the code is to check the length of the request. If it is empty, we'll put value of (empty) in the sessionScope variable.
If the request is not empty, we first create an empty ArrayList to hold decoded values.
Then, we loop through all elements in the request array. The values in the requestVar attribute are stored in an array of com.ibm.jscript.std.ObjectObject elements, thus the somewhat unusual way of getting its value, as shown on line 11. You'll see its usefullness when we come to the advanced examples.
Do note that the key name (manufacturer) in rqst[i].manufacturer must be the same as the key name we used when creating JSON data: var item = {manufacturer: $(this).text()};.
After we looped through all of the elements, we put the ArrayList in the sessionScope.
Finally, we return en empty JSON element {} since the calling jQuery.ajax() method expects it.
Configuring Domino server
In order to use REST services, you will need to enable Domino Access Services on your Domino server.
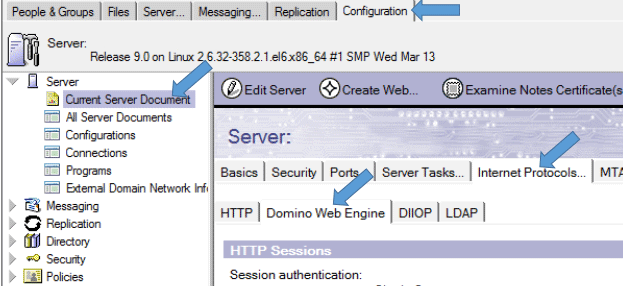
Start IBM Domino Administrator and access the server that hosts your XPages application. Click the Configuration tab, then Internet Protocols... > Domino Web Engine:
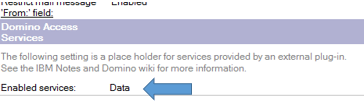
Scroll to the bottom of the page and find the section Domino Access Services. Under Enables services choose Data. Restart the HTTP task.
Putting it all together
Now we have all elements needed to send sorted list values to the server and use them. But, how do we put everything together?
The REST service is self-sufficient, so simply put it on your XPage.
The client side requires a bit more thought. First of all, it would be beneficial to create a function to hold code for reading list values and creating Ajax calls. You could put this function in a JavaScript library or in the same script block as the code to initialize HTML5 Sortable:
<script type="text/javascript">
  $(function () {
    $(".source, .target").sortable({
      connectWith: ".connected"
    });
  });

  function updateValues() {
    var items = [];
    $("ul.target").children().each(function() {
      var item = {manufacturer: $(this).text()};
      items.push(item);
    });
    var jsonData = JSON.stringify(items);
    $.ajax ({
      url: "dnd.xsp/setfavourites",
      type: "PUT",
      data: jsonData,
      dataType: "json",
      contentType: "application/json; charset=utf-8",
      success: function(){},
      error: function(){}
    });
  };
</script>
The second point to ponder is how often to update the server. There are two alternatives - automatically, each time a drag-drop-sort operation is performed or manually, by clicking a button or link once you finished sorting.
If you want automatic updates, you simply add a function call, like this:
$(function () {
  $(".source, .target").sortable({
    connectWith: ".connected"
  }).bind("sortupdate", function() {
    updateValues();
  });
});
This way, each time you change sort order of the elements, the updateValues() function is called and the server receives new sorted list. Depending on your server, available bandwidth, number of users and other requirements, this could be a totally acceptable way.
On the other hand, if you want to keep server load on minimum and only send values to the server when you are finished dragging, dropping and sorting, you can add a button that calls the updateValues() function:
<xp:button value="Update values" id="updateButton">
  <xp:eventHandler event="onclick" submit="false">
    <xp:this.script>
      <![CDATA[
        updateValues();
      ]]>
    </xp:this.script>
  </xp:eventHandler>
</xp:button>
So, now we know how to create a simple, yet fully functional, drag and drop control. We'll add a bit more features in the advanced examples.
Advanced examples spicing it up
Controlling output
If HTML5 Sortable satisfies your needs, you are good to go. But what if you need better control of your drag and drop?
Let's consider the first example. It has two features that are impossible to implement in HTML5 Sortable (without changing its source code):
- notice how elements are copied between the lists, instead of moved as in HTML5 Sortable;
- notice how you can delete an item from the target list — this is implemented by writing custom code for dropped elements.
And for that you'll need jQuery UI widgets. But, let's start by examining the HTML code for the first example:
<div class="sideBySide">
  <div class="left">
    <ul class="source">
      <li>Alfa Romeo</li>
      <li>Audi</li>
      <li>BMW</li>
      <li>Ford</li>
      <li>Jaguar</li>
      <li>Mercedes</li>
      <li>Porsche</li>
      <li>Tesla</li>
      <li>Volkswagen</li>
      <li>Volvo</li>
    </ul>
  </div>
  <div class="right">
    <ol class="target">
      <li class="placeholder">Drop your favourites here</li>
    </ol>
  </div>
</div>
As you can see, the code is almost identical to the code we used for the HTML5 Sortable example — we no longer use the class connected, we use an ordered instead of an unordered list for the target list and we have a single item in the target list with class placeholder.
As expected, it is the JavaScript code that makes all of the difference:
$(".source li").draggable({
  addClasses: false,
  appendTo: "body",
  helper: "clone"
});

$(".target").droppable({
  addClasses: false,
  activeClass: "listActive",
  accept: ":not(.ui-sortable-helper)",
  drop: function(event, ui) {
    $(this).find(".placeholder").remove();
    var link = $("<a href='#' class='dismiss'>x</a>");
    var list = $("<li></li>").text(ui.draggable.text());
    $(list).append(link);
    $(list).appendTo(this);
    updateValues();
  }
}).sortable({
  items: "li:not(.placeholder)",
  sort: function() {
    $(this).removeClass("listActive");
  },
  update: function() {
    updateValues();
  }
}).on("click", ".dismiss", function(event) {
  event.preventDefault();
  $(this).parent().remove();
  updateValues();
});
I use only a small subset of options and attributes that are available for each widget. Consult the
official documentation for the full list.
The first thing (lines 1–5) we need to do is to make list items draggable. We select all line items li having the class of .source and attach draggable(). We then set some options to make draggable() work to our liking:
- addClasses
- We use our own CSS classes, so we set this to
false. Set it to true if you want to use jQuery UI CSS styles. - appendTo
- This defines the bounding box for the control. Most often, you'll leave this at the default setting of
body. However, there might be times when you want to limit the area inside which a user can drag elements. Simply set the attribute to #myContainerName or similar. - helper
- Tells the widget to create a clone (copy) of the element to use in drag and drop operations.
Sometimes, you might encounter issues with overlap/z-index when you set appendTo: "body". If that happens, try to downsize the bounding box by changing the selector to something else, as described above.
Thereafter we have a long code that starts by selecting the target container (in our case an ordered list ol) by using the class selector .target. Then we chain droppable() and sortable() to it. on("click"…) has nothing to do directly with drag and drop and we'll come to it later.
We set the following options for droppable():
- addClasses
- We use our own CSS classes, so we set this to
false. Set it to true if you want to use jQuery UI CSS styles. - activeClass
- This is the class that gets added to your target container, each time you start dragging an element. In our example, it makes the target border extend downwards to highlight the drop zone.
- accept
- This option defines what elements are accepted by the target control. This could be useful if you have multiple drag and drop controls and want to prohibit mixing of elements. At any case, don't remove the value
":not(.ui-sortable-helper)", since it prevents helper elements generated by sortable() from appearing. - drop
- This function is called when you release the dragged item on the target control. It is here that we create an element to be displayed within the target control. But, first of all (line 12) we remove any element with class
.placeholder. In our example, this is the class responsible for showing the list item with the text "Drop your favourites here".
Then, we create a variable that holds HTML code for a link that we use to remove a list item (line 13). After that, on line 14, we create another variable to hold HTML code for a list item and attach to it the text from the dragged item (draggable is a jQuery object representing the element being dragged).
Finally, we append the link to the list item (line 15) and then append the list item to the parent — our sorted list (line 16). This results in HTML code similar to this:
<li>
  Volvo
  <a class="dismiss" href="#">x</a>
</li>
Line 17 calls the function updateValues() that we created above. This function will update the backend each time you drop an element onto the target control. Depending on your design (e.g. you prefer to manually update the backend by clicking a button) you may want to remove this function call.
The creation of list items could be written differently by taking advantage of element chaining. However, I chose this approach as I find it easier to follow and understand, especially for JavaScript beginners.
And this is how we set sortable():
- items
- Allows us to specify which elements inside the target control will be sortable. We only want to exclude the placeholder.
- sort
- This function is called during sorting. The only thing we do here is to remove the class
listActive from the sorted element. This class gets unintentionally added because of the interaction with droppable(). - update
- This is the function that get called when the sort order is updated. Here we call the function
updateValues(), but once again, it is up to you whether you want to update the backend with each change.
And finally, the on("click"…) function. We append this function to each link in the list item in order to make it possible to remove the list item. We target the links by using the class selector .dismiss (see generated HTML code above) and we override the click behaviour: when user clicks on the link, we first prevent normal link behaviour (line 28) and then we remove the link's parent, i.e. the list item element (line 29). Since we want to send all of the sort changes to the backend immediately, we end the function by calling updateValues() (line 30).
These are the CSS styles specific to this implementation (the others, such as source and target are the same as in the HTML5 Sortable example):
body > li {
  width: 177px;
  margin: 5px;
  padding: 5px;
  -webkit-border-radius: 4px;
  -moz-border-radius: 4px;
  border-radius: 4px;
  text-shadow: 0 1px 0 rgba(255, 255, 255, 0.5);
  list-style-type: none;
  list-style-position: inside;
  border-width: 1px;
  border-style: solid;
  border-color: #ccc !important;
  background-color: #fafafa !important;
  color: #bbb !important;
}
.listActive {
  border: 1px solid #ccc;
  background-color: #fcfcfc;
  padding: 0.5em 0 3em 0 !important;
}
.placeholder {
  list-style-type: none;
  text-align: center;
  font-style: italic;
  border: 1px dashed #ddd !important;
  background-color: #fff !important;
  color: #aaa !important;
}
.dismiss {
  float: right;
  position: relative;
  top: -8px;
  line-height: 20px;
  font-size: 12px;
  font-weight: bold;
  text-decoration: none !important;
  color: #468847;
}
The only really interesting thing here is the first style, body > li. It is used to style the element that is being dragged. While being dragged, this element (li in our case) is a child of the element (body in our case) we stated in the appendTo option (see draggable() above) and this is the only way to target and style it.
Enabling the key | label functionality
So far, you have seen how to create fairly advanced drag-and-drop controls. The last thing we'll examine is a technique, which, while not directly related to drag-and-drop, can help in developing applications.
It is often necessary to display one, often more verbose, information to application users, while in the back-end we work with other, more terse and precise, information. For example, we might display a product name to the user, while we prefer to work with the SKU of the product (because it is unique). Or, we display a contact's name and address, but we work with UNID in the background - because UNID makes it easy to get that contact's document from the database.
In other words, we work with key | label pairs.
If you are familiar with the "classic" Notes development, you have probably used key | label pairs for Combobox, Listbox, Dialog list, Checkbox or Radio button fields. Some of the XPages controls, such as Combo Box and List Box, also allow for the use of key | label pairs.
So, how do we use key | label pairs with our drag-and-drop controls? The answer is by using HTML5 data attributes. The HTML5 data attributes allow you to specify application specific attributes that you can assign to HTML tags, while maintaining validity of the HTML markup.
For example - assume you are creating an application that allows users to follow stock price of their favourite car manufacturers. You can use a drag-and-drop control for that, but instead of sending the name of the car manufacturers back to the server, you want to send their stock symbols. Something like this:
Car Manufacturers:
- BMW
- Daimler
- Fiat
- Ford
- Porsche
- Tesla
- Volkswagen
Stocks to watch: (none)
Here is the basic HTML code:
<div class="sideBySide">
  <div class="left">
    <ul class="source connected">
      <li data-stock-symbol="BMW">BMW</li>
      <li data-stock-symbol="DDFAIF">Daimler</li>
      <li data-stock-symbol="FIADF">Fiat</li>
      <li data-stock-symbol="F">Ford</li>
      <li data-stock-symbol="POAHF">Porsche</li>
      <li data-stock-symbol="TSLA">Tesla</li>
      <li data-stock-symbol="VLKAF">Volkswagen</li>
    </ul>
  </div>
  <div class="right">
    <ul class="target connected">
    </ul>
  </div>
</div>
The majority of the code should be familiar by now. The only new thing is the data-stock-symbol attribute, which, in fact is an HTML5 data attribute.
The data attributes consist of a mandatory prefix data- and a lowercase name. By convention, hyphens are used instead of spaces. The content of a data attribute can be anything that can be represented as a string (such as JSON).
The content can be read and set using three different techniques. For the sake of simplicity, let's take the following example:
<div id="manufacturer" data-stock-symbol="DDFAIF">Daimler</div>
The most natural way would be to use the native HTML5 dataset API. You would use it like this:
var manufacturer = document.getElementById("manufacturer");
// get value
var stock = manufacturer.dataset.stockSymbol;
// set value
manufacturer.dataset.stockSymbol = "DDFAIF";
As you can see, you access the data attribute by stripping the data- prefix, removing hyphens from the attribute name and converting it to camel case, so that data-stock-symbol becomes stockSymbol as in the example above.
Unfortunately, Internet Explorer 10 and below do not support the HTML5 dataset API, so you'll probably want to use one of the other two techniques.
The jQuery data() method will be the best option for the most uses. It is used like this:
var manufacturer = $("#manufacturer");
// get value
var stock = manufacturer.data("stock-symbol");
// set value
manufacturer.data("stock-symbol", "DDFAIF");
Finally, there are the standard JavaScript getAttribute() and setAttribute() methods, that you could use in case you don't have jQuery available:
var manufacturer = document.getElementById("manufacturer");
// get value
var stock = manufacturer.getAttribute("data-stock-symbol");
// set value
manufacturer.setAttribute("data-stock-symbol", "DDFAIF");
If you want to learn more about the HTML5 data attributes, I recommend you start with this
blog post.
Applying it to XPages
Now, let's take a look at how to apply data attributes in an XPages application. Once again, let's use the stock-choosing drag-and-drop control.
<ul class="source connected">
  <xp:repeat id="repeat2" rows="30" var="manufacturer" removeRepeat="true">
    <xp:this.value>
      <![CDATA[${javascript:
        return [["BMW", "BMW"], ["Daimler", "DDFAIF"], ["Fiat", "FIADF"], ["Ford", "F"], ["Porsche", "POAHF"], ["Tesla", "TSLA"], ["Volkswagen", "VLKAF"]];
      }]]>
    </xp:this.value>
    <xp:text escape="true" id="sourceLI" value="#{manufacturer[0]}" tagName="li">
      <xp:this.attrs>
        <xp:attr name="data-stock-symbol" value="#{manufacturer[1]}"></xp:attr>
      </xp:this.attrs>
    </xp:text>
  </xp:repeat>
</ul>
The code is very similar to the code we used in our first example.
You should note the following changes:
- Once again, a static array is used as a data source for the repeat control. This time, it is a two-dimensional array containing manufacturer's name and stock symbol. In a real application, you would probably use a view and itterate over documents containing necessary data.
- Computed text control has been extended with
<xp:this.attrs>...</xp:this.attrs> which allows us to define data attributes and set them programmatically.
The JavaScript code for reading data attributes is also very similar to the code we have already used. This is the adjusted code:
var items = [];
$("ul.target").children().each(function() {
  var item = {manufacturer: $(this).data("stock-symbol")};
  items.push(item);
});
var jsonData = JSON.stringify(items);
Instead of reading the text of each li element, we read the value of the data attribute. The rest of the implementation is the same as already described above.
Epilogue wrapping it up
I hope that you have found this blog series useful and that it will help you use drag-and-drop in your applications.
Please let me know if you should have any questions, comments or suggestions.